
Overview
Designers and small workshops often ask me how to foil stamp fewer than 100 business cards, only to find that the metal plate fee on the print shop's quote eats up most of the budget
If you have a limited budget but still want that high-end look, there are indeed ways to bypass traditional plate making
In this article, I will break down everything from processing principles and paper selection to file pitfalls, helping you save on the costs of trial and error
What DIY or plate-free methods are available for small-batch foil stamping?
In the past, at printing plants, the base price for a traditional zinc or copper foil stamping plate was around 500 to 1,000 NTD. Doing only 50 copies was never cost-effective
If you want to do it yourself in your studio, or find a vendor for ultra-small batch printing, these are the paths you can take:
・Laser Toner Transfer: Leveraging the property that toner melts when heated, combined with a store-bought laminator and thermal transfer foil, this is the most common DIY studio solution
・Foil Quill (Heating Pen): Attaching a tool with a heating tip to a machine like a Cricut to stamp metallic lines along vector paths, suitable for extremely small-batch handmade cards
・Digital Foil Stamping (Sleeking): Directly finding a professional printing house with this technology, which uses special digital ink to print the pattern, followed by full-sheet foil coverage, heating, and stripping
All three methods save the cost of traditional metal plates. Among them, toner transfer has the lowest barrier to entry and is the easiest to acquire equipment for
Why does a laser printer plus a laminator allow you to foil stamp yourself?
Once you understand the material properties, foil stamping is essentially a physical-chemical reaction of "temperature, pressure, and medium."
Inks from standard inkjet printers are absorbed by paper, but the principle of a laser printer is to heat-fuse toner, which contains plastic particles, onto the paper surface
When you cover the toner with thermal transfer foil and feed it into a laminator heated to about 150°C, the toner melts briefly and becomes tacky, firmly grabbing the metallic layer from the foil
The specific operation involves just four steps:
・Step 1: Print the pattern to be foiled using a laser printer in pure black-and-white mode at the highest density setting
・Step 2: Cut the thermal transfer foil to a suitable size and place it metallic-side up over the black toner area
・Step 3: Cover with a sheet of tracing paper or parchment paper to prevent sticking, and feed it flat into a preheated laminator
・Step 4: After the whole sheet has cooled, slowly peel off the foil; the areas that were originally black will have turned into a shiny metallic color
The difference in quality between traditional foil stamping and digital plate-free methods
Many clients who try toner foil stamping themselves feel that it doesn't quite have the same feel as high-end business cards printed externally
The biggest difference lies in the texture created by "pressure."
Traditional foil stamping involves a metal plate heated to over 200°C, pressed deep into the paper by a machine weighing several tons, which creates a subtle, recessed 3D feel along the metallic edges
DIY toner foil stamping, like digital foil stamping at a print shop, results in foil that is "flat-applied" to the paper surface; it feels completely smooth
Additionally, I often see designers choose the wrong paper, buying 300lb watercolor paper or cotton paper to play with toner foil stamping
Uncoated paper like this has deep pores on the surface, causing the toner to sink in, which leads to uneven pressure from the laminator rollers, resulting in patchy, broken foil. I recommend that DIY beginners practice using smooth coated paper or ultra-snow white coated paper
How to prepare files to avoid a blurry mess during foil stamping
Whether you are using your own laminator or submitting files to MINDS Printing for digital foil stamping, the logic for file settings is exactly the same
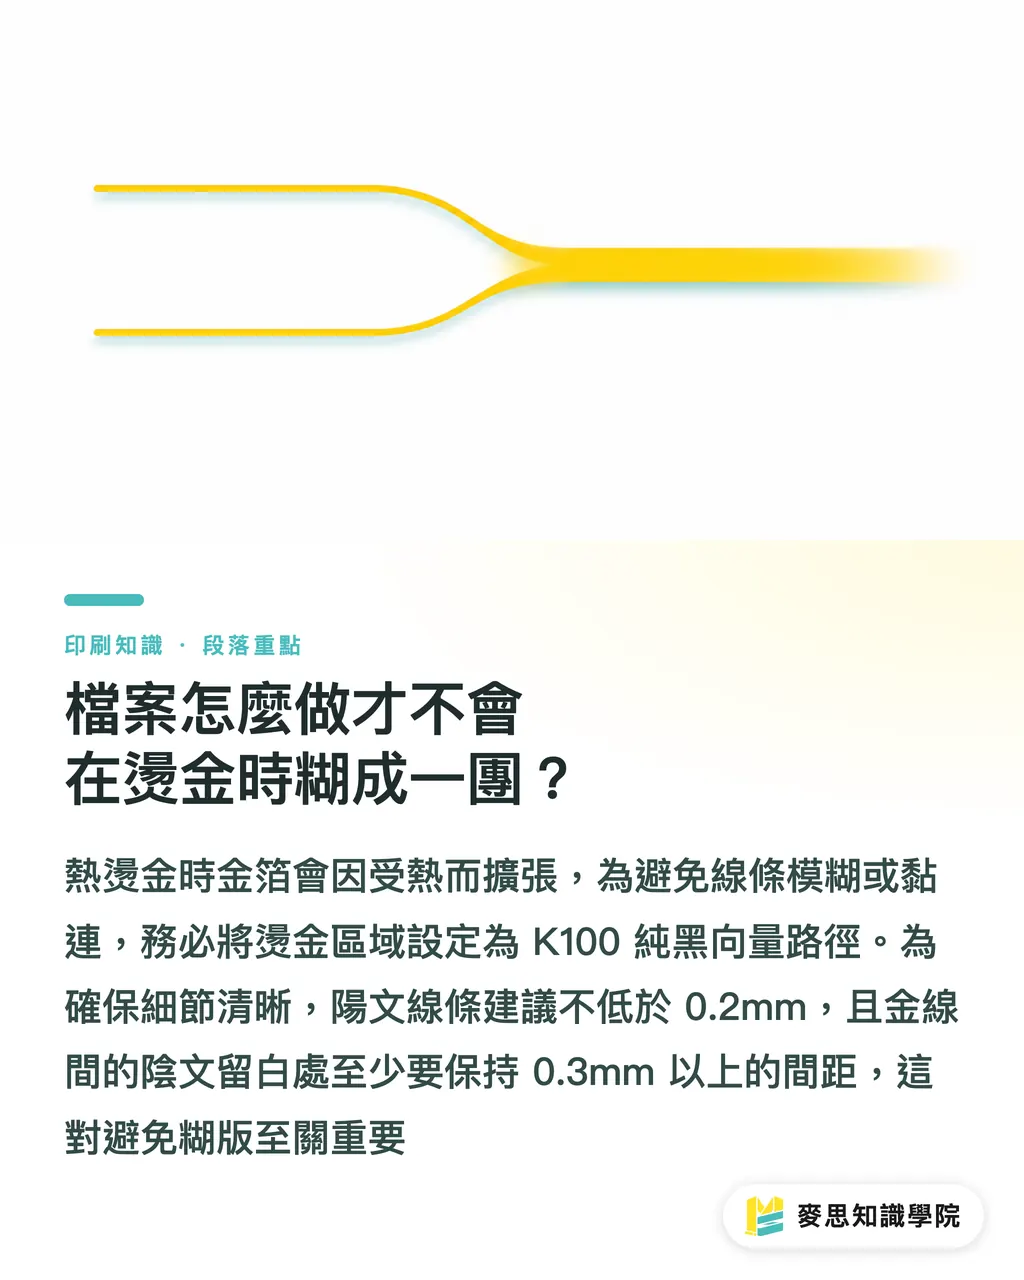
When foil melts under heat, its physical nature is to expand slightly. If lines are too close together, they will inevitably merge
Based on my experience handling countless rejected files, please strictly adhere to the following bottom lines:
・The foiled part must be a 100% monochrome black (K100) vector path; grayscale, transparency, or halftone dots are strictly prohibited
・The minimum thickness for positive lines (lines to be foiled in gold) should not be lower than:
・0.2mm, which is approximately equivalent to the following in Illustrator:
・0.57pt
・Negative lines (the empty space between two gold lines) must be at least 0.3mm; this is the life-or-death threshold to avoid blurry plates
・For Chinese fonts, avoid extremely thin Ming or handwritten styles. If you zoom in and see overlaps in the brush strokes, it will turn into a solid gold block when printed
Key Takeaways
・The best DIY solution for small-batch foil stamping is to use the heat-melting property of laser toner combined with a laminator
・Traditional foil stamping comes with a unique, pressed-in texture, while digital and DIY foil stamping sits smoothly and flat on the paper surface
・Choosing smooth, coated paper can significantly reduce the probability of patchy or flaking DIY foil edges
・The spacing of positive and negative lines in foil stamping files must be greater than 0.3mm to prevent the pattern from blurring due to heat expansion
Reflections
From manual proofing in small studios to the one-stop service of MINDS Printing, technological advancements have drastically lowered the barrier to creating high-end finishes
As a designer, you can use laser toner foil stamping as a rapid proofing tool when communicating proposals to clients, bringing them the most intuitive visual impact
Once you confirm you are moving into mass production or require more stable quality and lead times, you can then hand off well-prepared vector files to a printing house for digital or traditional foil stamping. This is the approach that balances development flexibility with commercial value
FAQ
- Can inkjet printers be used for DIY foil stamping?
- Absolutely not. Inkjet ink does not melt and become tacky when heated; you must use toner from a laser printer for the foil to adhere
- Why is the foil I stamp with a laminator always missing patches here and there?
- It is usually because the paper surface is too rough, leading to uneven pressure, or the laminator is not hot enough (below 150°C). I recommend switching to smoother paper and letting the machine preheat for five more minutes before trying again
- Is there a difference in file preparation between digital foil stamping and traditional foil stamping?
- The basic logic is the same; both must be pure black vector paths. However, when traditional foil stamping plates are made, technicians on the shop floor can help fine-tune the metal plate pressure, whereas for digital foil stamping, the machine outputs exactly what is in the file, so control over line spacing must be much stricter and more precise
Related articles


The Print × AI weekly
The print and AI know-how designers, brands and enterprises can use before they commit — one email, every week
MINDS Free Tools
Spine width and imposition calculators — skip the manual math, free in your browser.
MINDS Group
Need actual printing or gifting services?
From premium printing to online ordering and festive gifts — the MINDS Group sister brands take it from here.